Le Yang's Project Portfolio Page
Project: bookmark
bookmark is a desktop book management application that allows user to manage their books and reading progress. It allows users to track which page they stopped reading at. It also has features like adding goals and notes to help improve their reading experience. A user will interact with bookmark through a GUI created with JavaFx and invoke commands through a Command Line Interface.
Given below are my contributions to the project.
Summary of Contributions
-
Code contributed: RepoSense
-
New Feature: Added the ability to undo previous commands and redo undone commands.
-
What it does: Allows the user to undo previous commands or redo commands that have been undone.
-
Justification: This feature enhances the application by allowing the user to easily undo any mistakes made when entering a command. As an application that relies on a Command Line Interface, typing mistakes are inevitable, hence the undo command would be very useful in providing convenience to the user. The redo command also allows the user to move back and forth in history, allowing users to conveniently compare changes.
-
Highlights: This feature must work with all other commands as well as future commands to be added. Hence proper brainstorming and planning of the implementation had to be done to ensure the implementation can be easily extended to work with future commands. Furthermore, the feature should not affect the speed of the application, hence care had to be taken to ensure redundant states are not stored in order to improve the memory efficiency. The implementation was challenging as the application will display the book in different ways according to user entered commands, hence there was not only a need to keep track of the changes to the books stored, but also how the books were being displayed in order to allow the undo/redo command to bring the application back to exactly how it was.
-
-
New Feature: Added ability for Ui to switch between a summarised and detailed view of the books stored.
-
What it does: Allows the user to select and view a specific book in detail. The application by default shows a summarised view of books but users can use the view command to select a specific book and view its complete details.
-
Justification: This feature enhances the application by ensuring that users are not overwhelmed by too much information. Some information, such as the content of the notes added to the books, will only be shown when viewing a book in detailed view. This prevents the Ui from being overcrowded with too much information and allows the user to focus their attention on a specific book of interest, improving user experience.
-
Highlights: This feature must work fast as switching between views should be as smooth as possible to ensure a good user experience. Hence, special care was taken to minimize unecessary re-renderings. Furthermore, the Ui needed to be in sync with changes to the Model. The above requirements were met using an implementation that applied the Observer design pattern. Additionally, as I had no prior experience with JavaFX, I had to pick up and learn JavaFX quickly in order to successfully implement this feature.
-
- Enhancements to existing features:
-
Contributions to team member’s enhancements:
- Did the initial refactoring of the code inherited from the AB3 project. #76
-
Documentation:
- Developer Guide:
- User Guide:
- Wrote documentation for the
undoandredofeatures. #115
- Wrote documentation for the
-
Project Management and Dev Ops:
- Managed releases v1.2 and v1.3 on GitHub
- Set up the team GitHub repo
- Managed the team repo’s issue tracker
- Community:
Contributions to the Developer Guide
Given below are some of the contributions I made to the Developer Guide.
Changing Ui view
Implementation
bookmark’s UI supports two types of views: the default, summarised view which displays summarised information regarding the books stored, and the detailed view which displays detailed information about a particular book.
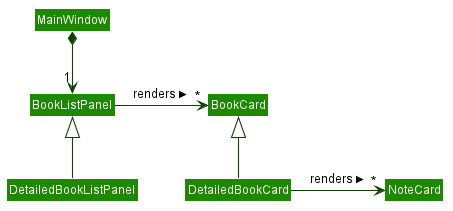
BookListPanel BookCard as well as its corresponding subclasses DetailedBookListPanel and DetailedBookCard facilitates
the display of book information.
When in the summarised view, MainWindow renders BookListPanel which displays the book information using BookCard,
while in the detailed view, DetailedBookListPanel is rendered which displays the book information using
DetailedBookCard. DetailedBookCard will in turn use other components to display the book information,
such as NoteCard to display the notes added to a book.
Both BookListPanel and DetailedBookListPanel makes use of JavaFX’s ListView to display the BookCard or DetailedBookCard
respectively.
The class diagram below shows the relevant classes involved:
Switching between the two views
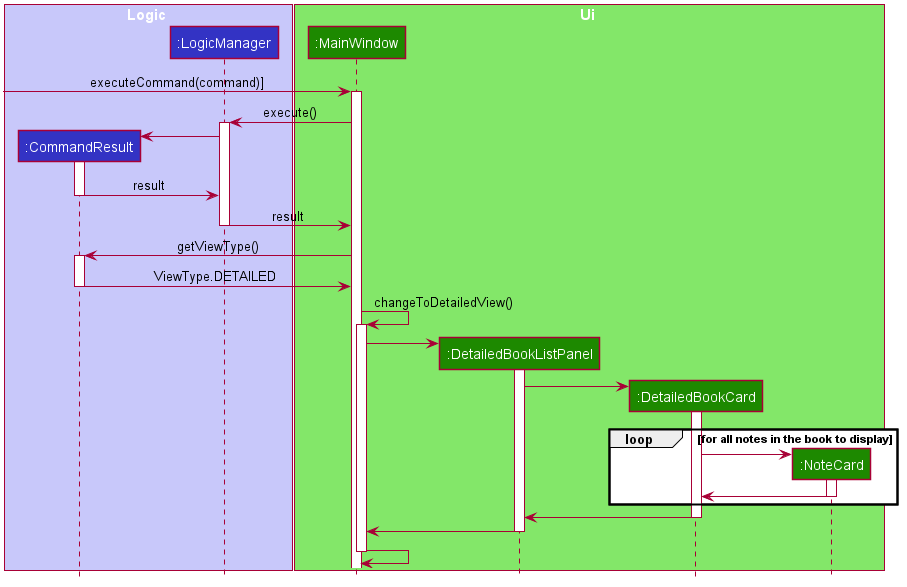
MainWindow and CommandResult facilitates the switching between the two views.
MainWindow#executeCommand() initializes all changes to what is displayed by the UI by calling Logic#execute()
which returns a CommandResult. MainWindow#executeCommand() is called when user enters a command into the application.
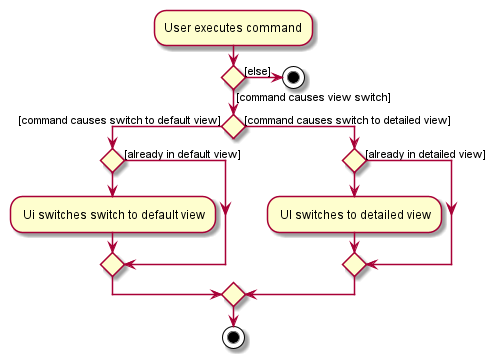
From the returned CommandResult, CommandResult#getViewType() indicates how the UI should switch its view.
CommandResult#getViewType() returns a ViewType, of which there are three types:
-
ViewType.DEFAULT- Instructs UI to switch to the default, summarised view -
ViewType.DETAILED- Instructs UI to switch to the detailed, single book view -
ViewType.MOST_RECENTLY_USED- Instructs UI to stay in whatever view it is in
Based on the type of ViewType returned by CommandResult#getViewType(), MainWindow#resetView(),
MainWindow#changeToDetailedView(), or no method is called accordingly.
The activity diagram below illustrates the flow of execution when the UI decides which view to use:
Below is a sequence diagram that shows a scenario whereby the UI switches from the default summarised view to the detailed view:
Design considerations
Aspect: What to display DetailedBookCard with
-
Alternative 1 (current choice): Use JavaFX ListView
- Pros: Easy to keep UI up to sync with model by overriding ListCell’s updateItem method
- Cons: Extra care must be taken to not allow multiple books to be displayed as detailed view is only meant to show one book
-
Alternative 2: Use other JavaFX layouts
- Pros: More in-line with the purpose of the detailed view of showing only one book
- Cons: More work has to be done to sync up the UI with the model.
Undo/redo feature
Implementation
The undo/redo mechanism is implemented by storing the state of the application after each command. The state of the application can be divided into two components:
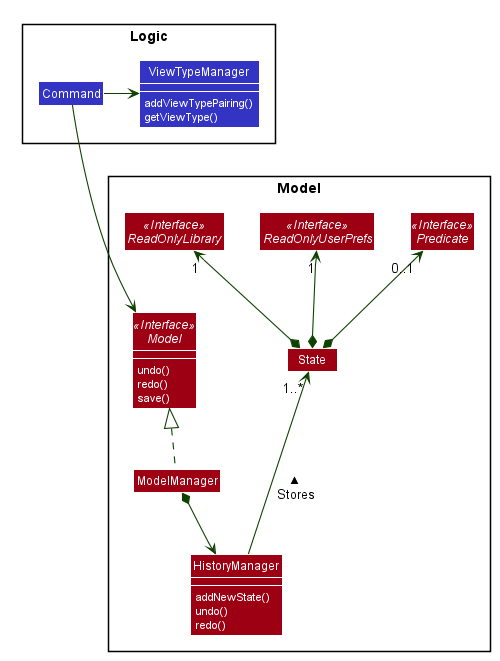
The state of the Model is managed by HistoryManager. It does so by storing State objects. Each State object contains a
ReadOnlyLibrary, ReadOnlyUserPrefs and a Predicate used to decide which books stored in the Model should be visible to
users. HistoryManager maintains a current state property representing the current state of the Model. It also stores
previous states that be restored via a redo or undo.
-
HistoryManager#addNewState()— Adds a new state to be used as the current state -
HistoryManager#undo()— Restores the most recent previous state. -
HistoryManager#redo()— Restores the most recently undone state.
The state of the Ui is managed by ViewTypeManager.
The state of the Ui refers to what ViewType the Ui is in (see Changing Ui View).
ViewTypeManager maintains a mapping between State objects and a ViewType. This mapping indicates what
ViewType the Ui should be given a particular State of the Model.
-
ViewTypeManager#addViewTypePairing()— Adds a new pairing between a givenStateandViewType -
ViewTypeManager#getViewType()— Get the correctViewTypefor the givenState
Whenever the user enters any commands EXCEPT:
helpexit-
undoandredoitself
the method Model#save() will be called which adds a new State, representing the new state of the Model, to HistoryManager
and causes HistoryManager to store the previous State. Additionally, ViewTypeManager#addViewTypePairing() will be
called to create a new pairing between the newly created State and the appropriate ViewType to use to display the contents of the
Model to the user. The stored States and its corresponding ViewType pairing will be used to change the application
state accordingly when a undo or redo operation, exposed as Model#undo() and Model#redo() respectively, is executed.
The class diagram below illustrates the classes that facilitates the undo and redo feature.
The next section will go into more detail about how the state of the application is managed as well as how undo and redo executes.
How state is managed
HistoryManager manages state by keeping a current state variable as well as two deques, an undo deque and a redo deque.
The undo deque stores the states to be recovered via an undo command, while the redo deque stores previously undone states
to be recovered via a redo command. ViewTypeManager maintains a map that maps State objects to a corresponding
ViewType.
Below is an example to illustrate how undoing and redoing works in a typical scenario.
Step 1. The user launches the application for the first time. The HistoryManager will be inititalised with the
initial state of the model as the current state, i.e State 1. Undo and redo deques will be empty. ViewTypeManager’s map
will also only have 1 entry, mapping the initial State to ViewType.DEFAULT.

Step 2. The user executes add command to add a new book. The command will call the Model#save() method
which will create a new State, State 2, representing the new state of the Model and add it into HistoryManager via the
HistoryManager#addNewState() method. State 2 will now be the current state while the previous current state, State 1,
will be pushed into the undo deque. ViewTypeManager’s map will be updated accordingly by calling the
ViewTypeManager#addViewTypePairing() method with State 2 and the correct ViewType to be used to display State 2 to
the user.

Model#save(), so the state will not be saved.
Step 3. The user decides that adding the book was a mistake and decides to undo the action by using the undo command.
This causes the current state, State 2 to be pushed to the redo deque. State 1 will be popped from the undo deque and
made the current state. ViewTypeManager#getViewType() will be called with State 1 in order to get the correct
ViewType to display State 1 with.

The following sequence diagram shows how the undo operation works:

Step 4. The user changes his mind again, deciding that he wants to add the book. He redoes the action by using the redo
command, causing the current state, State 1 to be pushed back into the undo deque and State 2 to be popped from the redo
deque and made the current state. Again, ViewTypeManager#getViewType() will be called to get the correct ViewType
to display State 2 with.

Step 5. Now suppose the user adds a book and then edits a book, causing State 3 and State 4 to be created. He then
undoes the edit command. HistoryManager will now look like this:

Step 6: The user decides to then delete a book, causing State 5 to be created and made the current state. The previous current state, State 3, will be pushed into the undo deque while the redo deque is cleared and hence State 4 is deleted.
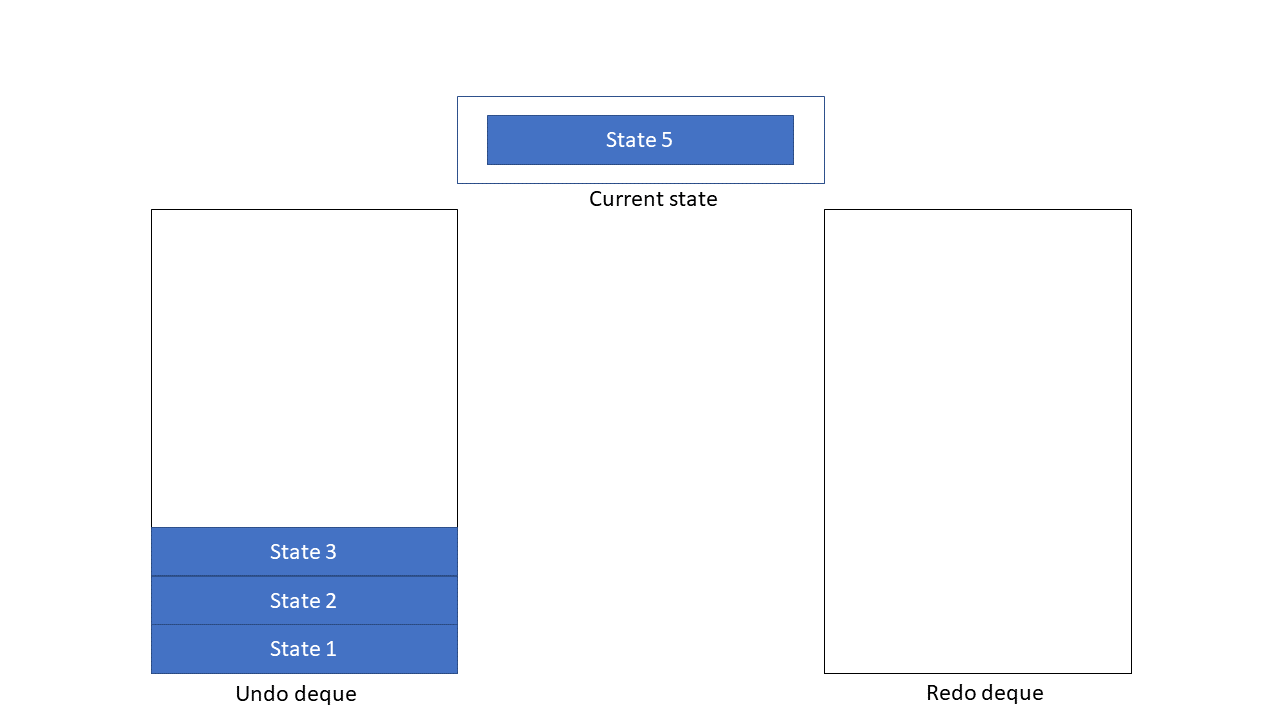
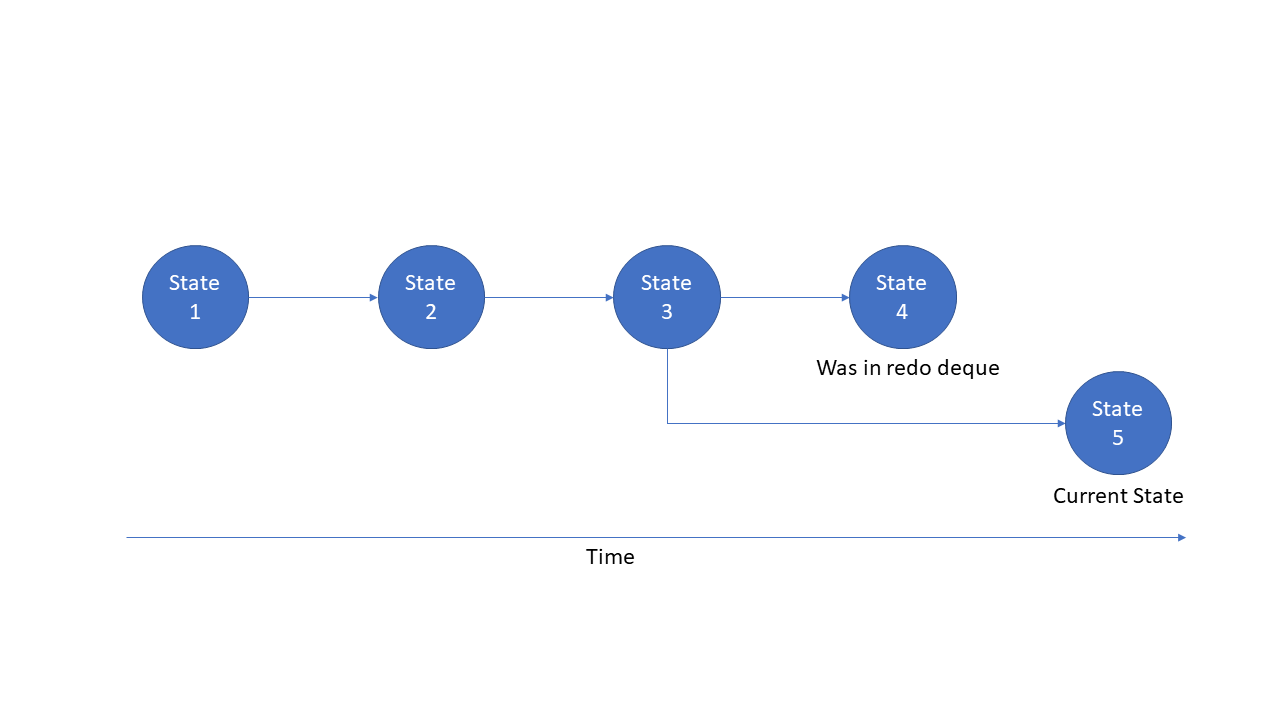
This design choice of clearing the redo deque when a new state is added was made because states existing in the redo deque cannot be represented in a linear, sequential path together with newly added states. Hence, it will be confusing to allow users to redo to these states. To see this, we can plot the evolution of state changes in a sequential manner:
To get a clearer picture, we consider what could occur if the redo deque is not
cleared upon adding new state into the HistoryManager.
Consider a scenario where the redo deque originally contains some state. The user subsequently enters 5 commands that each create a new state and the redo deque is never cleared upon new states being added. Then, the user enters the redo command, causing the top-most state in the redo deque to be popped and made the current state. As a result, all the changes that the user has done through the 5 commands are removed in a single redo command, which is not the intended behaviour.
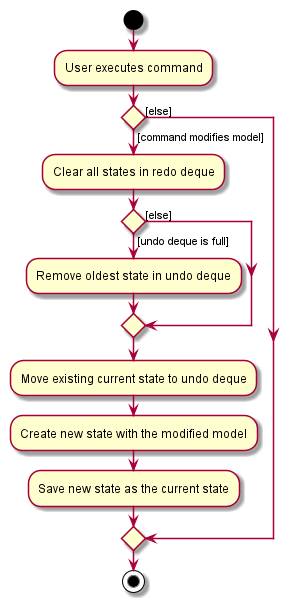
Furthermore, to prevent excessive memory usage, a cap on the number of states stored by HistoryManager’s undo deque
can be set in HistoryManager#MAX_UNDO_COUNT. If a new state is added but the undo deque is already at max capacity,
then the oldest state in the undo deque will be deleted to make room. A similar strategy is employed for ViewTypeManager,
with its map being implemented as a FIFO cache with a fixed maximum size.
The activity diagram below explains the flow of execution when a new state is added to HistoryManager.
Design considerations
Aspect: How undo & redo executes
-
Alternative 1 (current choice): Saves copies of the entire
LibraryandUserPrefsinState.- Pros: Easy to implement.
- Cons: May have performance issues in terms of memory usage.
-
Alternative 2: Individual command knows how to undo/redo by
itself.
- Pros: Will use less memory (e.g. for
delete, just save the book being deleted). - Cons: We must ensure that the implementation of undoing/redoing of each individual command are correct, complexity builds up as more commands are added.
- Pros: Will use less memory (e.g. for
Alternative 1 was eventually chosen as there was no noticable performance degradation during testing with a reasonable cap (10) on the number of states stored. It is also much more scalable and less prone to breaking upon addition or modification of commands.
Aspect: How to decide which actions should create and save state
-
Alternative 1 (current choice): Expose a method in the
Modelinterface that when called creates and saves state.- Pros: More declarative, easier to see when the model will create and save state.
- Cons: Worse separation of concerns, the responsibility of deciding when to create and save state is moved away from the model and to the components that interact with the model.
-
Alternative 2: The methods implemented by
ModelManagerto modify the model such asModelManager#addBook()also creates and save state.- Pros: Better separation of concerns, the model is responsible for deciding what actions constitute a modification and thus warrants the creation and saving of state.
- Cons: The creation and saving of state becomes a side effect, not immediately clear that it occurs.
Alternative 1 was eventually chosen as we liked the declarative nature of it as well as the clarity it provides. We also felt that alternative 2 could cause a lot of problems if a command needed to modify the model in multiple ways thus would cause multiple states to be created for a single command.